mirror of
https://gitee.com/huanghongxun/HMCL-docs.git
synced 2025-02-24 04:24:03 +08:00
All checks were successful
continuous-integration/drone/push Build is passing
Co-authored-by: Yuhui Huang <i@huangyuhui.net>
265 lines
10 KiB
Markdown
265 lines
10 KiB
Markdown
---
|
||
title: "Nginx作为静态资源服务器,使用HMCL启动器配置服务器客户端自动更新"
|
||
permalink: /modpack/serverpack2.html
|
||
date: 2023-01-11 14:13:45 +0800
|
||
categories: 整合包
|
||
toc: true
|
||
---
|
||
|
||

|
||
|
||
> 本文由 buggzd 编写。
|
||
|
||
> 阅读本文前,请先阅读HMCL官方文章:https://hmcl.huangyuhui.net/help/launcher/serverpack.html
|
||
# 前置知识
|
||
阅读本文你需要具有以下知识储备:
|
||
1. 掌握基础本的linux命令操作,比如cd,ls等指令。
|
||
2. 拥有一个linux服务器(好像不算知识)
|
||
|
||
# Nginx安装
|
||
这里很基础(但是坑比较多)略过,可以看以下参考文档。
|
||
> https://zhuanlan.zhihu.com/p/515069497
|
||
# 新建静态资源文件夹
|
||
我为了省事直接在/根目录下新建了一个` MinecraftClientStatic `文件夹,以后需要作为静态资源的文件都丢这里面。
|
||
命令:
|
||
```bash
|
||
# 到更目录
|
||
cd /
|
||
# 新建文件夹
|
||
mkdir MinecraftClientStatic
|
||
# 防止nginx无法访问,配置文件夹访问权限
|
||
chmod 777 MinecraftClientStatic
|
||
# 进入文件夹
|
||
cd MinecraftClientStatic
|
||
# 新建一个测试用的文件
|
||
touch helloMC.html
|
||
# 给文件权限
|
||
chmod 777 helloMC.html
|
||
# 编辑html内容
|
||
vim helloMC.html
|
||
```
|
||
这里为了测试静态资源是否配置成功,需要新建一个helloMC.html的静态测试文件。可以在这个文件内随意写两行字。
|
||
例如:
|
||
```html
|
||
<!-- helloMC.html -->
|
||
<h1>hello static!</h1>
|
||
```
|
||
也可以整点炫的(可选):
|
||
```html
|
||
<!-- helloMC.html -->
|
||
<!DOCTYPE html>
|
||
<html>
|
||
|
||
<head>
|
||
<meta charset="UTF-8">
|
||
<title>MC客户端静态资源</title>
|
||
<meta name="viewport" content="width=device-width, initial-scale=1, maximum-scale=1, user-scalable=no" />
|
||
<style>
|
||
@font-face{
|
||
font-family:'calligraffittiregular';
|
||
src:url("fonts/calligraffitti-regular-webfont.ttf")
|
||
}
|
||
|
||
* {
|
||
margin: 0;
|
||
padding: 0;
|
||
}
|
||
|
||
body {
|
||
overflow: hidden;
|
||
}
|
||
|
||
#content{
|
||
position: absolute;
|
||
color: white;
|
||
top: 30%;
|
||
left: 50%;
|
||
margin-left: -121px;
|
||
}
|
||
|
||
p{
|
||
font-family: calligraffittiregular
|
||
}
|
||
|
||
</style>
|
||
</head>
|
||
|
||
<body>
|
||
<div id="content">
|
||
<p style="font-size: 40px;font-weight: 1000;">MinecraftClientStatic</p>
|
||
</div>
|
||
<canvas id="hacker" style="width:100%;height:100%;">请使用最新的浏览器</canvas>
|
||
</body>
|
||
|
||
</html>
|
||
<script type="text/javascript">
|
||
window.onload = function() {
|
||
var color_array = ['#00FF00','#00FF99','#00FFCC','#00FFFF','#00BBFF','#0066FF','#0000FF','#5500FF','#7700FF','#9900FF','#CC00FF','#FF00FF'];
|
||
var i=0;
|
||
var color;
|
||
function changColor() {
|
||
color = color_array[i];
|
||
console.log(i++);
|
||
console.log(color);
|
||
if(i>color_array.length-1){
|
||
i=0;
|
||
}
|
||
setTimeout(changColor, 2000);
|
||
}
|
||
|
||
var hacker = document.getElementById("hacker");
|
||
var width = hacker.width = screen.width;
|
||
var height = hacker.height = screen.height;
|
||
var ctx = hacker.getContext('2d');
|
||
var num = Math.ceil(width / 12);
|
||
var y = Array(num).join(0).split('');
|
||
var draw = function() {
|
||
ctx.fillStyle = 'rgba(0,0,0,.05)';
|
||
ctx.fillRect(0, 0, width, height);
|
||
ctx.fillStyle = color;
|
||
ctx.font = '12px Microsoft YaHei';
|
||
y.map(function(y1,i){
|
||
var text = String.fromCharCode(65 + Math.random() * 62);
|
||
var x = i * 12;
|
||
var y1 = y[i];
|
||
ctx.fillText(text, x, y1);
|
||
y[i] = ( y1 > Math.random() * 10 * height ? 0 : parseInt(y[i]) + 12 );
|
||
})
|
||
}
|
||
|
||
Run();
|
||
|
||
function Run() {
|
||
changColor();
|
||
Game_Interval = setInterval(draw, 50);
|
||
}
|
||
}
|
||
</script>
|
||
```
|
||
# 分配次级域名(可选)
|
||
> 如果你没有域名,那么这里可以跳过,后面需要域名的地方直接使用服务器ip地址
|
||
|
||
**假设我们的域名是buggzd.com**
|
||
|
||
在域名解析新建一个记录,取名为minecraft,然后加上服务器ip。
|
||

|
||
这是我们就有了一个子域名minecraft.buggzd.com
|
||
添加完成后可以使用cmd去ping一下这个域名(minecraft.buggzd.com),如果返回了正确的ip地址就是已经分配成功了。
|
||
# 配置nginx.conf
|
||
查找nginx配置文件目录:(如果这里没有nginx指令,那么说明你nginx安装没有成功)
|
||
```shell
|
||
$ nginx -t
|
||
$ nginx: the configuration file /etc/nginx/nginx.conf syntax is ok
|
||
```
|
||
这里`/etc/nginx/nginx.conf`就是Nginx的配置文件
|
||
然后cd到nginx配置目录。
|
||
```bash
|
||
cd /etc/nginx
|
||
# 编写配置文件
|
||
vim nginx.conf
|
||
```
|
||
因为之前配置过博客逆向代理,`nginx.conf`会带有之前的配置记录,不能把他们搞乱。所以**理清层级关系很重要!**
|
||
```nginx.conf
|
||
# 这是nginx.conf的层级目录
|
||
# 每个nginx.conf配置文件都只有一个http块,所以如果之前配置过nginx
|
||
# 就只需要粘贴server块里的内容,把server块放到http块内部。
|
||
http {
|
||
server { ... }
|
||
server { ... }
|
||
server { ... }
|
||
}
|
||
```
|
||
需要填写的配置:
|
||
```nginx.conf
|
||
http {
|
||
server {
|
||
# 需要监听的端口号,可以不动
|
||
listen 80;
|
||
# 这里需要把localhost改为上面分配好的域名
|
||
server_name minecraft.buggzd.com;
|
||
location /{
|
||
# root后面是对应的静态资源文件夹的位置
|
||
root /MinecraftClientStatic;
|
||
# 这里是默认加载的首页html,这里放的是刚刚新建的测试文件
|
||
# 它是从root目录文件夹内开始查找的,所以不要写/MinecraftClientStatic/helloMC.html
|
||
index helloMC.html;
|
||
}
|
||
}
|
||
```
|
||
> Q:上面的配置干了什么事?
|
||
> A:比如你访问http://minecraft.buggzd.com/test.png时,nginx会访问本地的/MinecraftClientStatic/test.png 然后返回。
|
||
|
||
当正确编写完`nginx.conf` ,需要让nginx重新加载一下配置文件。
|
||
```shell
|
||
nginx -s reload
|
||
```
|
||
然后直接访问刚刚配置的域名(minecraft.buggzd.com),默认会跳转到编写好的`helloMC.html`,你也可以在域名后加/helloMC.html (minecraft.buggzd.com/helloMC.html)
|
||
|
||
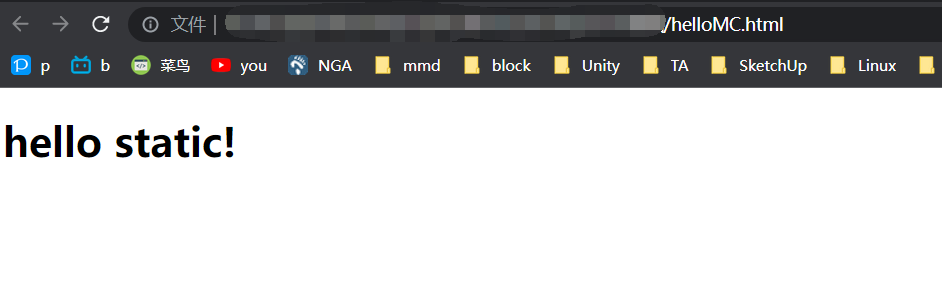
当页面出现`helloMC.html`的文本内容时,说明已经配置成功了!
|
||
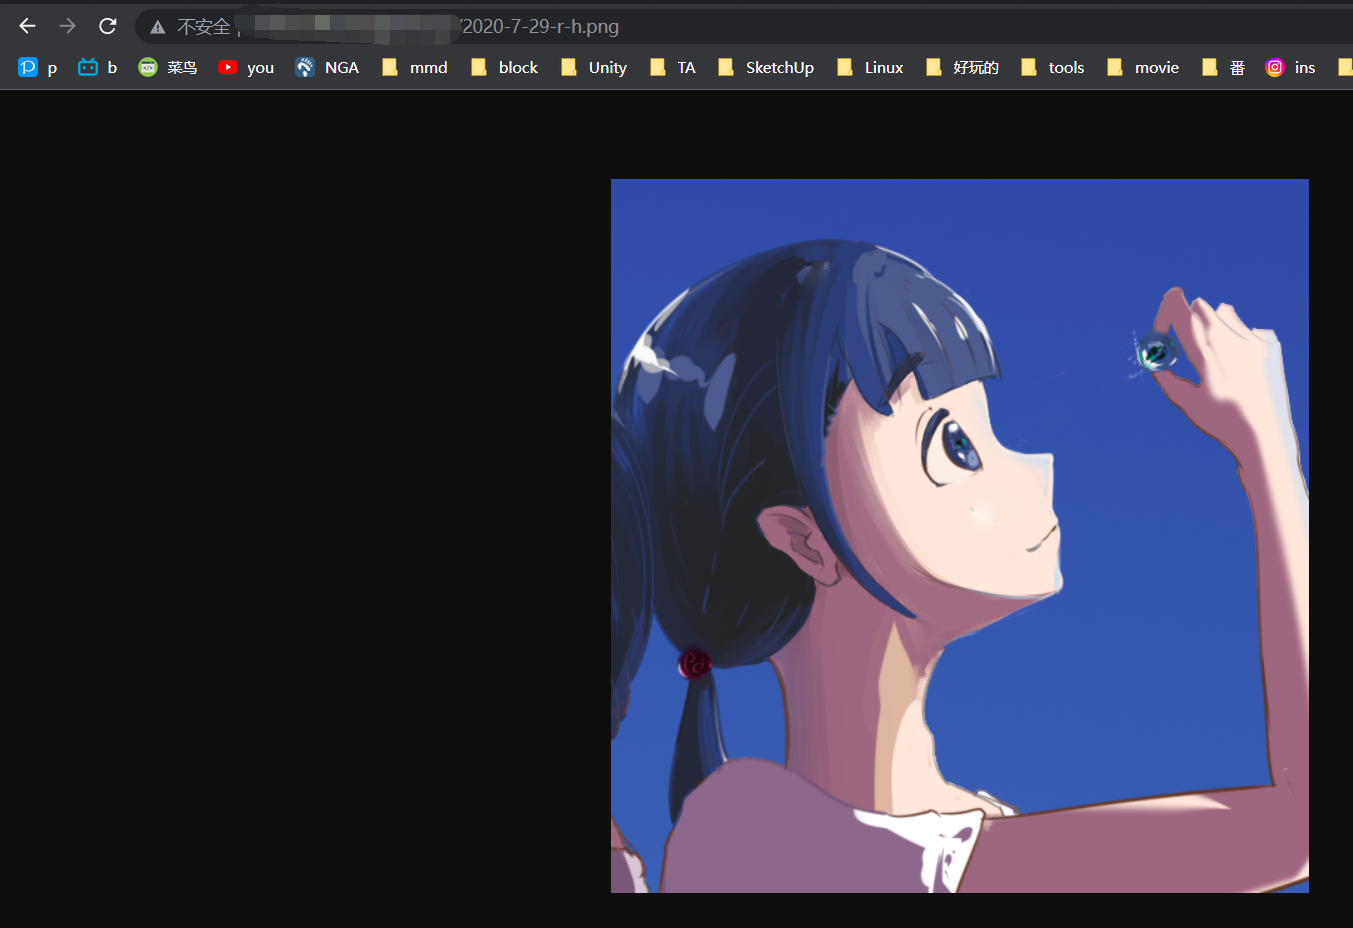
放张图片到静态资源文件夹试试。
|
||
|
||
访问成功,没问题!
|
||
|
||
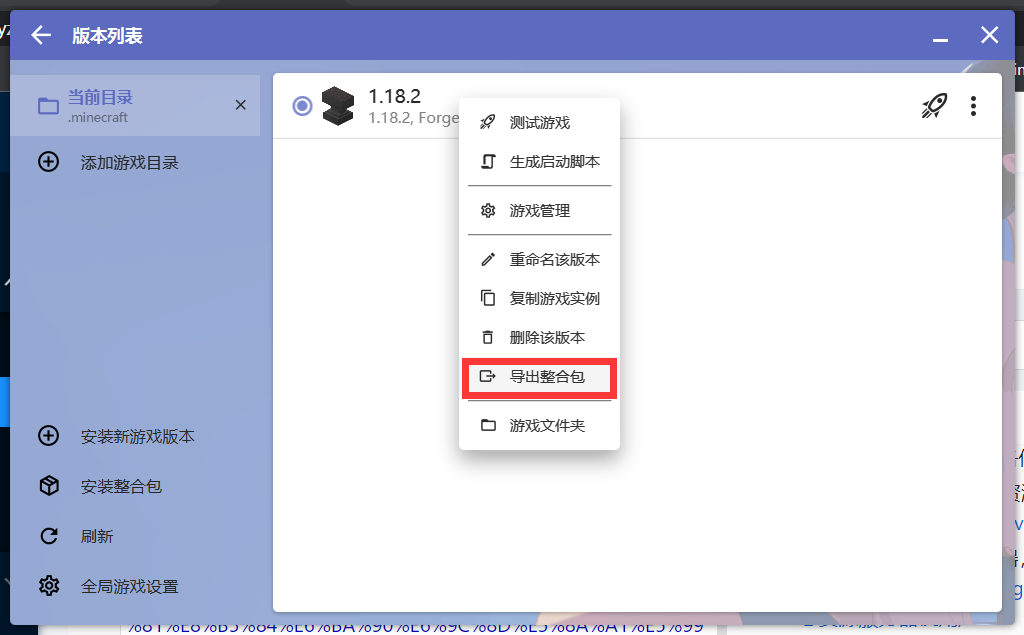
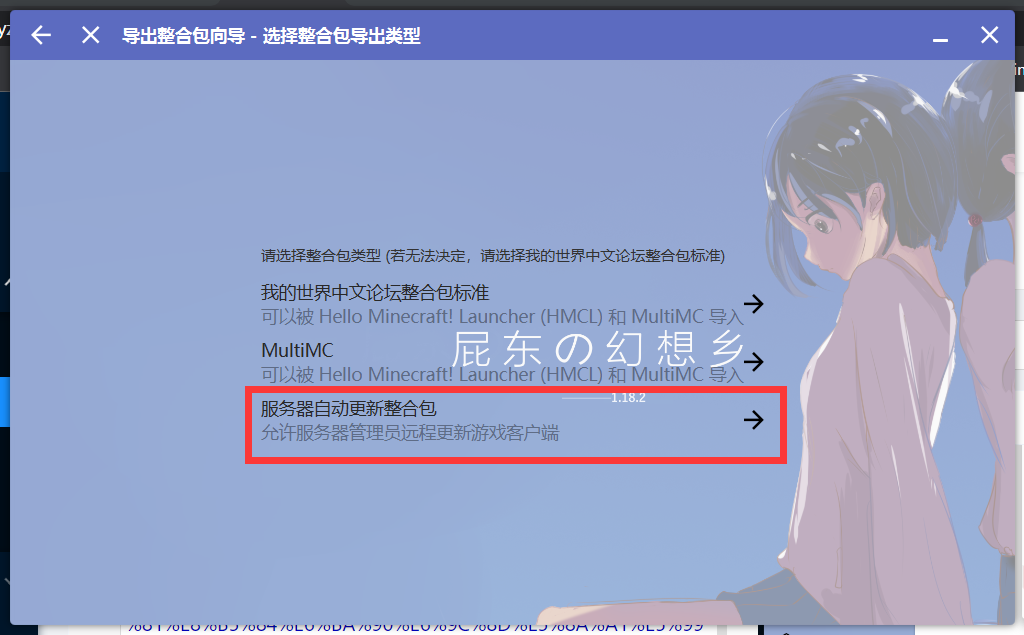
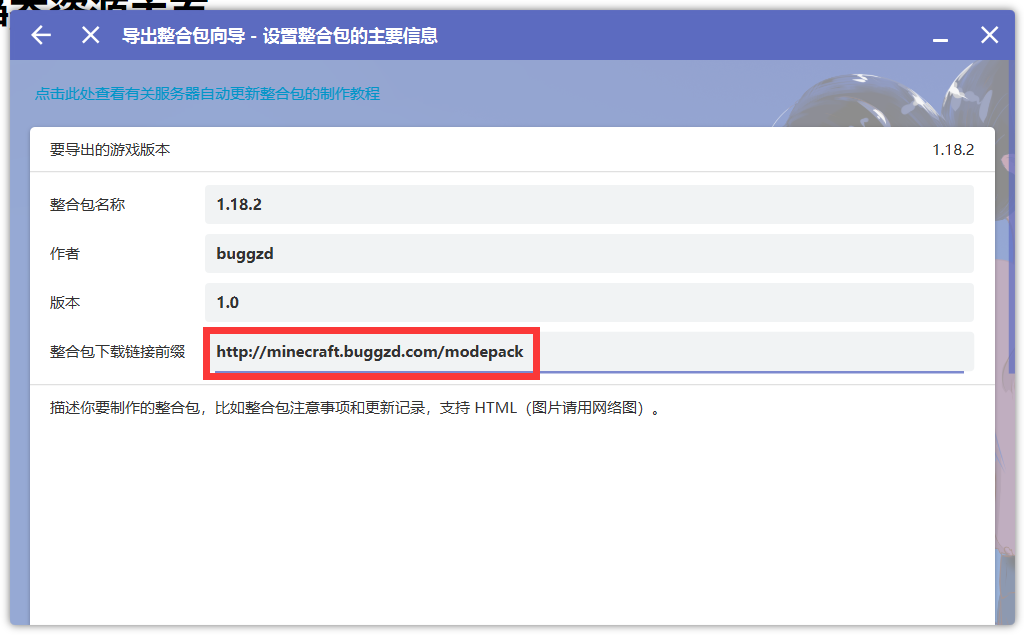
# 导出整合包
|
||
|
||
选择服务器自动更新整合包
|
||
|
||
**整合包下载链接前缀**:填静态资源服务器的地址。
|
||
我们需要先去静态资源文件夹下新建一个modepack文件夹(也就是/MinecraftClientStatic/modepack)
|
||
```shell
|
||
cd /MinecraftClientStatic
|
||
mkdir modepack
|
||
```
|
||
然后整合包下载链接前缀这里填写`http://minecraft.buggzd.com/modepack`
|
||
|
||
# 上传整合包到静态资源服务器
|
||
假设我们刚刚打包的整合包名称为`client1.0.zip`
|
||
我们把`client1.0.zip`通过ftp上传到服务器中,然后使用解压命令将这个整合包解压到`/MinecraftClientStatic/modepack`文件夹中。
|
||
```shell
|
||
# 假设我们把client1.0.zip上传到了/home/ftp文件夹中
|
||
# 把 /home/ftp/client1.0.zip 解压到 /minecraftClientStatic/modepack
|
||
unzip /home/ftp/client1.0.zip -d /minecraftClientStatic/modepack
|
||
```
|
||
解压完以后我们查看一下
|
||
```shell
|
||
ls /minecraftClientStatic/modepack
|
||
```
|
||
服务器返回:
|
||
|
||
<font color="blue">overrides</font> server-manifest.json
|
||
|
||
其中overrides是一个文件夹,server-manifest.json是整合包配置文件。
|
||
# 客户端初始化
|
||
第一次使用客户端需要在一个空文件夹(例如newClientPackage)中放一个hmcl启动器,打开hmcl导入刚刚做好的`client1.0.zip`整合包。
|
||
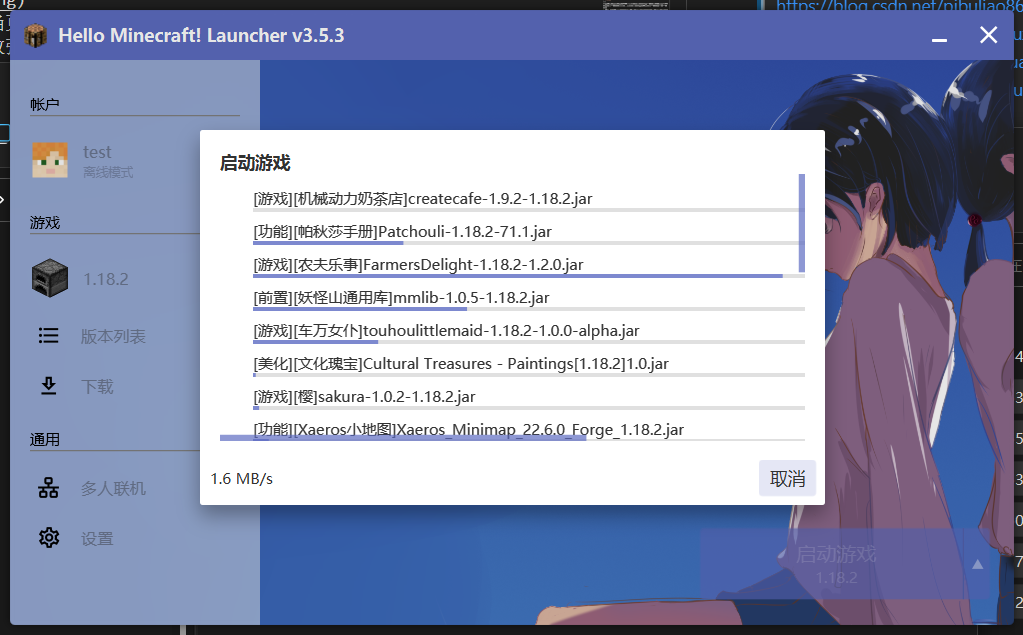
然后就可以把这个文件夹(newClientPackage)打包成一个zip发给玩家了,以后玩家每次打开hmcl登录时,hmcl就会自动向静态资源服务器中查询整合包配置信息,当发现更新时会自动下载。
|
||
当缺少mod时会自动下载静态资源服务器上的mod
|
||
|
||
# 更新客户端
|
||
目前HMCL版本更新的步骤是这样的:
|
||
1. hmcl对比本地的mod和服务器的mod**名称**,发现服务器上存在本地不存在的mod,把不存在的mod下载。
|
||
2. 对比名称相同的mod,当对比的mod存在**名称相同时**,对比其**MD5哈希值**,如果哈希值不匹配则重新下载服务器上的mod。
|
||
3. 在获得更新的时候对比一次本地的文件,如果以前版本的模组在新的版本没有了,hmcl会自动将本地的这个模组删除
|
||
4. 在不通过远端服务器更新的资源都不会被下次更新删除,换句话说就是如果是玩家自己魔改整合包,往里面放的mod是不会被删除的。
|
||
|
||
当想要添加新的mod,添加mod后需要重新导出整合包(例如client2.0.zip),导出的整合包版本号增加,然后重新上传整合包到静态资源服务器。
|
||
```shell
|
||
cd /minecraftClientStatic
|
||
# 建议直接删除该目录然后重新新建
|
||
rm modepack -R
|
||
# 重新新建modepack文件夹
|
||
mkdir modepack
|
||
# 解压新的客户端整合包
|
||
unzip /home/ftp/client2.0.zip -d /minecraftClientStatic/modepack
|
||
```
|
||
玩家打开hmcl点击启动后,HMCL就会检测到版本更新,自动更新mod。
|
||
|
||
> 参考资料:
|
||
> nginx配置文件结构:https://blog.csdn.net/pibuliao8626/article/details/110449349
|
||
> 使用nginx如何部署静态资源:https://www.muzhuangnet.com/show/86630.html
|
||
> Nginx 作为静态资源服务器:https://zhuanlan.zhihu.com/p/514547633
|
||
> nginx配置静态静态资源服务器:https://cloud.tencent.com/developer/article/2028983?from=15425
|
||
> HMCL官方文章:https://hmcl.huangyuhui.net/help/launcher/serverpack.html
|
||
> 使用Gitee作为静态资源服务器:https://www.kdocs.cn/l/ck0hwms5llq8
|
||
> Nginx配置静态资源服务器:https://buggzd.github.io/2023/01/11/Nginx%E9%9D%99%E6%80%81%E8%B5%84%E6%BA%90%E6%9C%8D%E5%8A%A1%E5%99%A8%E4%BD%BF%E7%94%A8/
|
||
|